Get started
1. Upload
Upload your song(s) via this secure link:
Online Mastering Smash Upload
Type a message when you upload or send an email about your project.
2. Book and get feedback
You will get a confirmation email within 24 hours. Together we will schedule a slot for your song(s).
Ask for a mix check and you will get it free of charge.
3. Download your master
Once you have approved the master you can pay the invoice via PayPal or bank transfer.
Satisfaction guaranteed.
Frequently Asked Questions
Can I use Dropbox or Google Drive?
Unless Smash Upload is down please use Online Mastering Smash Upload.
What are the specs for mix files?
· 24 bit WAV or higher
· Keep the project sample rate
· Do not clip or limit the mix
More tips below.
What is your turnaround?
Typically a week. Longer in late spring and autumn.
Ask for 48 hour express service on singles.
What is your revision policy?
I will revise any master free of charge, although the mix itself sets the limit for how much it can be optimized.
How does payment work?
After your approval of the master you can pay the PayPal request with any major credit card.
A SEPA wire transfer can also be arranged.
What are the terms & conditions?
Recall mastering based on a client revised mix file will be billed as other editing.
PayPal requests and invoices require payment in full within 7 days.
Mixdown tips for mastering
Article version 2.2. Updated 2019-01-14.
Part 1 - Formats and export/bounce settings
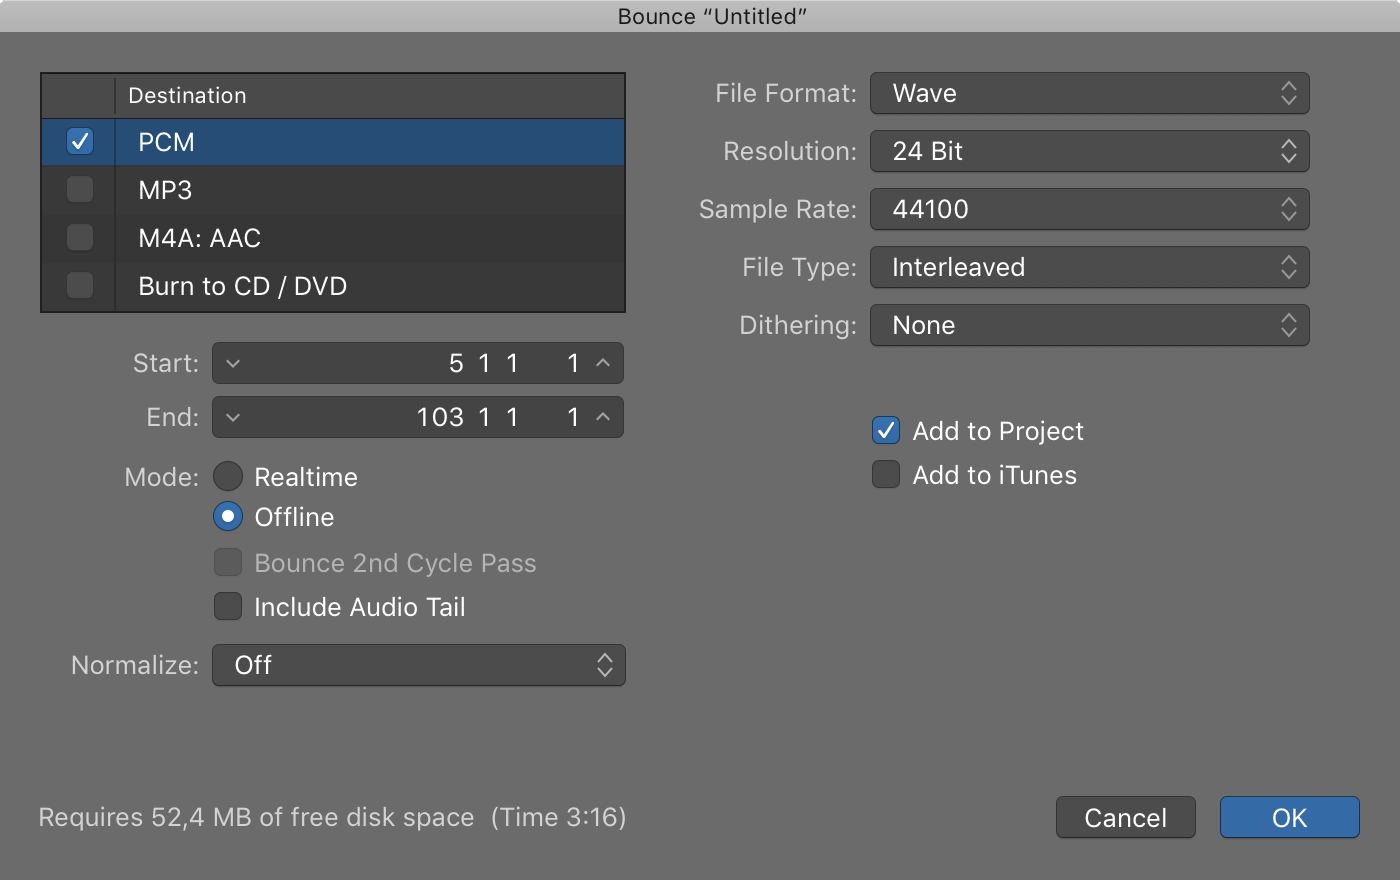
File format
WAV or AIFF is preferable.Other acceptable formats: BWF, SDII or CAF. All acceptable formats are so-called PCM files and have the same sound quality.
Not recommended formats: MP3, OGG, AAC, M4A or FLAC. Lossy formats such as MP3 or AAC have worse sound quality than PCM files. FLAC is lossless but impractical due to the additional conversions required.
Stereo format
Interleaved stereo is preferable.Most DAWs automatically export a stereo mixdown as interleaved stereo, which results in a single stereo file on the disk.
Some DAWs also have a split stereo option, which exports the mix into a left and a right mono file on the disk. There is no audio difference between interleaved and split stereo, but the latter takes up more space and is file name sensitive during import.
Bit depth/resolution
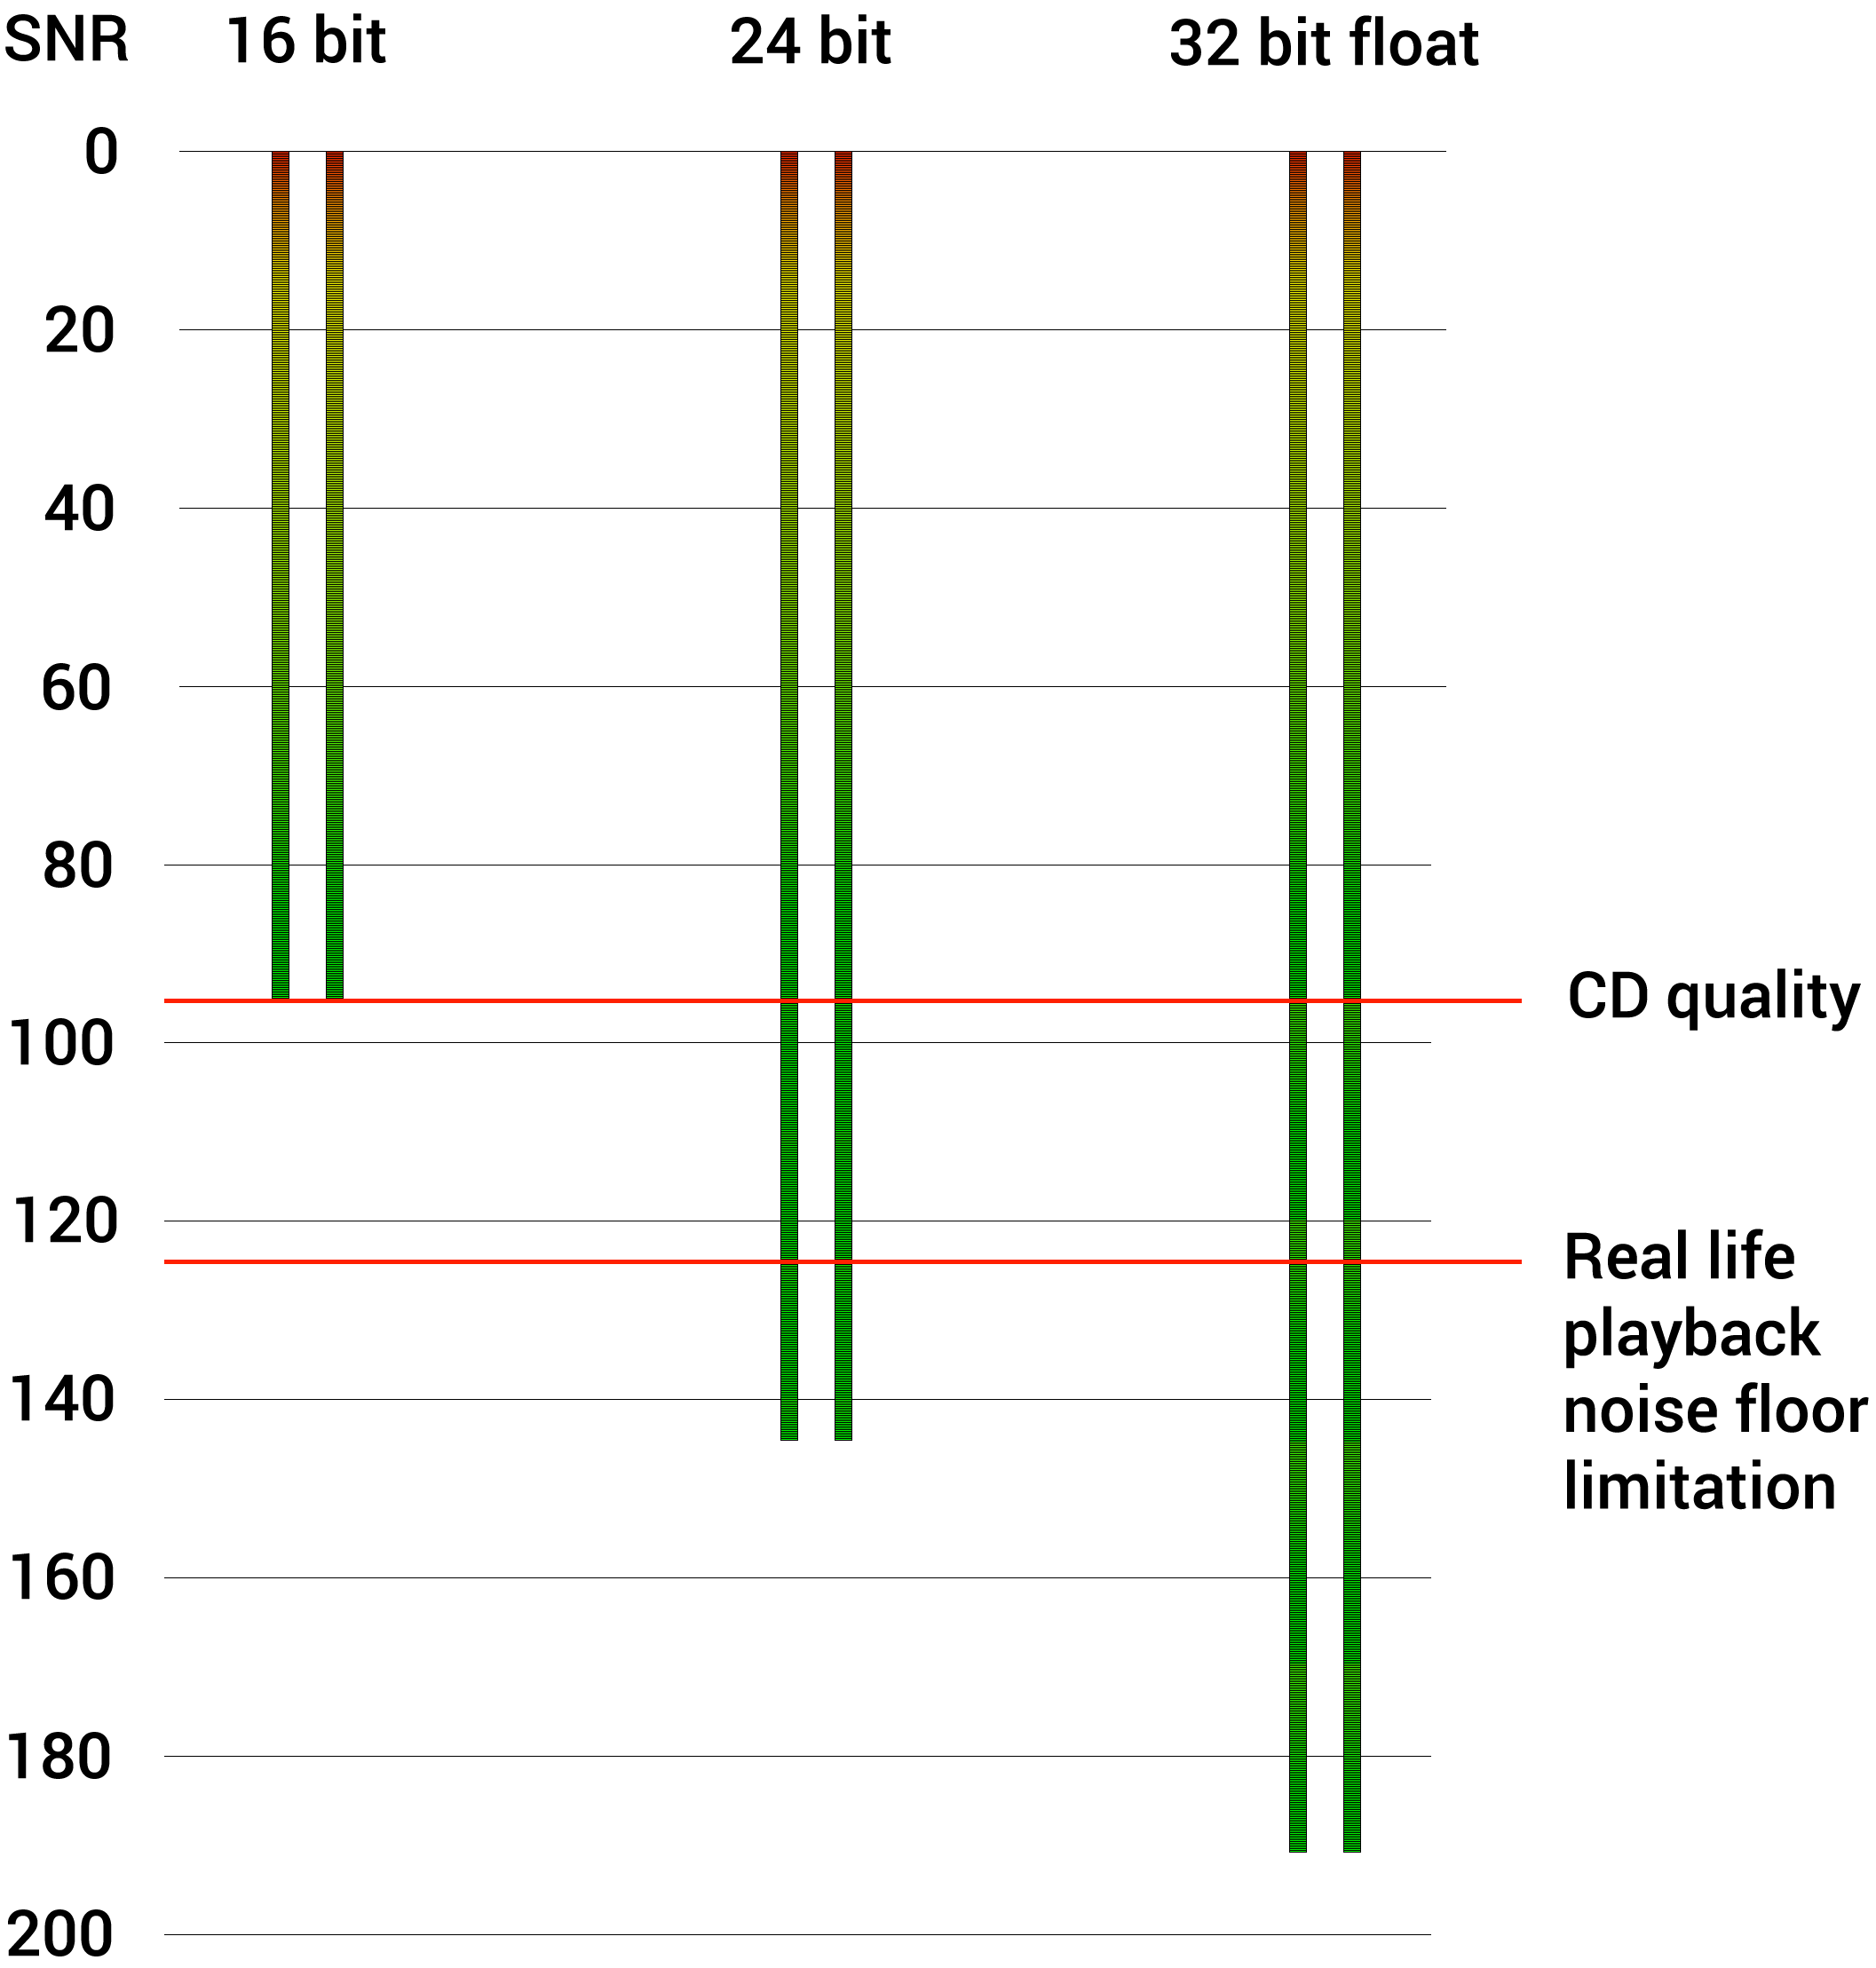
24 bit or 32 bit float is preferable.Compared to a 16 bit file, the extra bits in a 24 bit file are not “spread out” as finer steps of resolution, rather they increase the signal-to-noise ratio (SNR) with very low level signals.
A 32 bit float file offers more internal headroom and scaling flexibility. The audible advantage over a 24 bit file is debatable, but 32 bit float is theoretically superior.
16 bit is perfectly acceptable when there is no other source available, e.g. an old DAT, Audio CD or portable recorder source.
Dither
Flat/TPDF or no dither is preferable.Dither reduces correlated quantization artifacts by instead adding random noise just below the noise floor during the reduction process. Dither is relevant when you convert from a higher to a lower bit depth, especially when the target is a 16 bit file.
When the target is a 24 bit file meant for further processing, such as a mixdown for mastering, then flat/TPDF dither or no dither is the safest choice. Quantization noise in a 24 bit file is already extremely low.
Shaped dither algorithms like POW-r, UV22HR or MegaBit+ are best reserved for the final step of the mastering process.
32 bit float files do not require dither.

Sample rate
Keep the original sample rate of your project.If your project was produced and mixed in 44.1 kHz, then export your mix at the original sample rate, i.e. 44.1 kHz. Do not upsample your mix during export. The quality will not improve, it will only get worse due to superfluous re-calculations.
If your project was produced and mixed in 48 kHz or above, then export your mix at the original sample rate, e.g. 48 kHz. Do not downsample your mixdown to 44.1 kHz or upsample it higher than the original project sample rate.
I will perform the final conversion here with state of the art software or I will capture at the target sample rate.
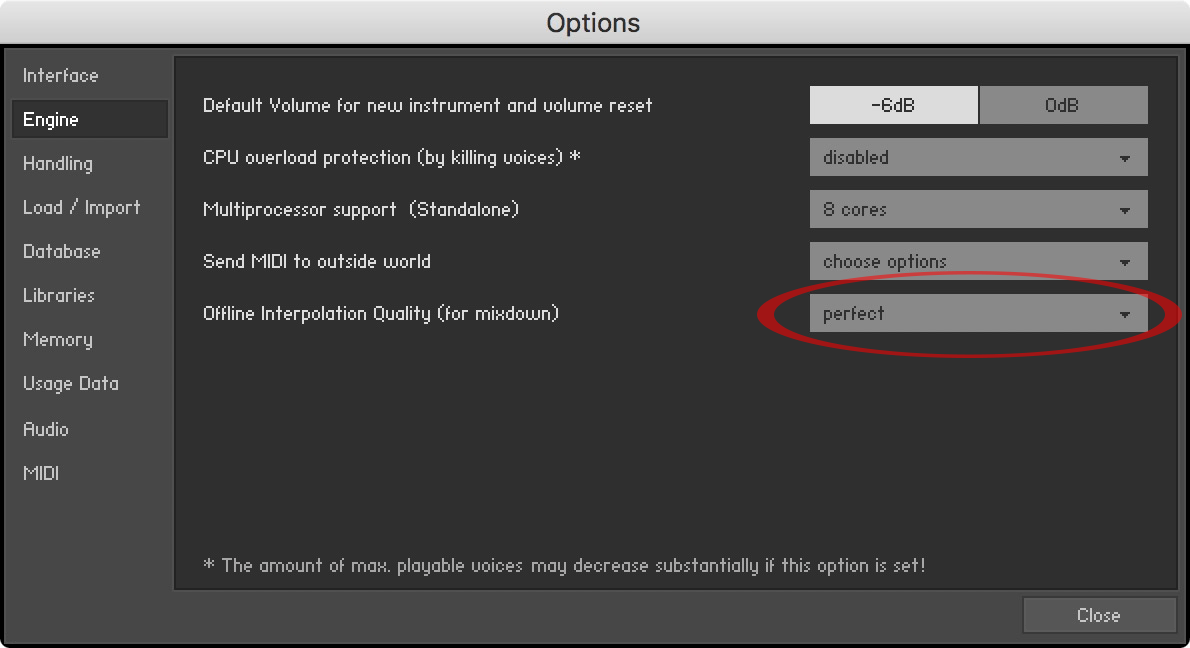
Sample interpolation quality and other HQ settings
Most DAWs and plug-ins will automatically render everything at the highest possible quality.There are some exceptions:
In FL Studio, choose 512-point Sinc for the best sample interpolation quality. This affects instruments using pitched samples. In FL Studio also check “HQ for all plug-ins” for native FL Studio plug-ins.
Some plug-ins, such as Kontakt from Native Instruments, have an internal interpolation quality setting for offline rendering. Choose the highest possible setting. This advice is relevant to all DAWs, if such a plug-in is in use.
Notice that using high quality interpolation can increase offline rendering time considerably.
Realtime or offline export/bounce
Offline rendering is often the best solution.However, there are pros and cons to both methods. In theory both could and often do sound identical (except for intentional random variations in some plug-ins), but there are exceptions:
First of all, realtime is the only option when outboard gear or external instruments, such as an external MIDI synth or an analog compressor, are inserted via an I/O loop or live channel in the mix.
Realtime has the benefit of “what you hear is what you get”, i.e. the timing of unsynchronized effects and random reverbs sound identical in the exported file to how they sounded during that particular realtime playback.
However, realtime is more prone to glitches during heavy CPU or hard disk load since everything needs to happen in realtime. On the other hand, if it sounded good during playback, the file will sound just as good.
Offline processing is potentially much quicker and more stable since it is not under the pressure of realtime CPU and disk performance. Furthermore, as mentioned above in “Sample interpolation quality or other HQ settings”, some high quality settings will only be activated during offline rendering. This means an offline export has the potential to sound better than a realtime version - depending on your DAW and what plug-ins you use.
You should always check an offline export by playing the exported file from start to finish before sending it to mastering. Double-checking a realtime mixdown file or at least giving it a cursory check before sending it off for mastering is also a good idea.
Start/end/fade
Set the start locator to one bar before the song begins. Set the end locator a couple of bars after the song ends. Do not fade out the full mix yourself.Adding space before the song begins ensures that plug-in delay compensation is aligned and that the first sound is not cut off by mistake.
Adding a few bars at the end ensures that reverb and delay tails are fully included in the mixdown.
Finally, this pre and post roll can provide a potential background noise imprint for noise reduction in analog mixes at the mastering stage.
If your song requires a fade out, then do not fade out the song yourself. Doing so can result in a more noisy and less smooth fade out in the final master. Instead provide a reference file with a fade out or let me know an approximate fade out time, e.g. “please fade out from 3:29 to 3:45”.
Part 2 - Headroom and plug-ins on the stereo output
Headroom
Export your mix to a 24 bit file or higher and stay below 0 dBFS. Do not apply limiting on the mixdown.Headroom is the amount of signal left before a mix clips/overloads the stereo output. So if the highest peak on the stereo output occurs at -3 dBFS then there is 3 dB of headroom before it reaches full scale at 0 dBFS.
There is no exact amount of peak level required in a mixdown for mastering, such as an often quoted value of -6 dBFS. -6 dBFS is a perfectly usable peak level, but so too are a much wider range of peak levels. I will deal diligently with subsequent digital headroom, inter-sample peaks, and analog reference levels here.
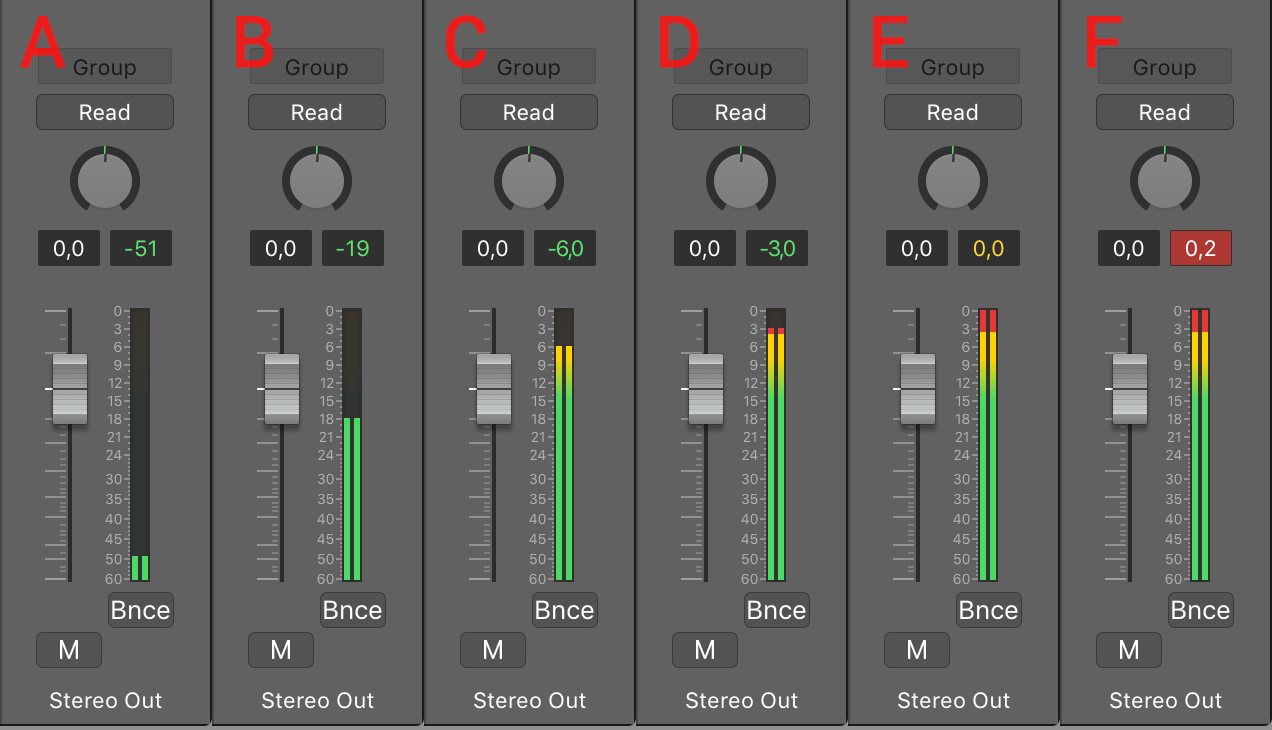
Do not use a limiter or a similar plug-in just to reduce peaks in the full mix. Instead simply lower the stereo output fader. All DAWs have 32 or 64 bit floating point audio engines that scale the signal losslessly.
A 32 bit float export has increased headroom, but you still need to make sure you do not overload the stereo output while mixing, since this affects what you hear, and the decisions you make while mixing.
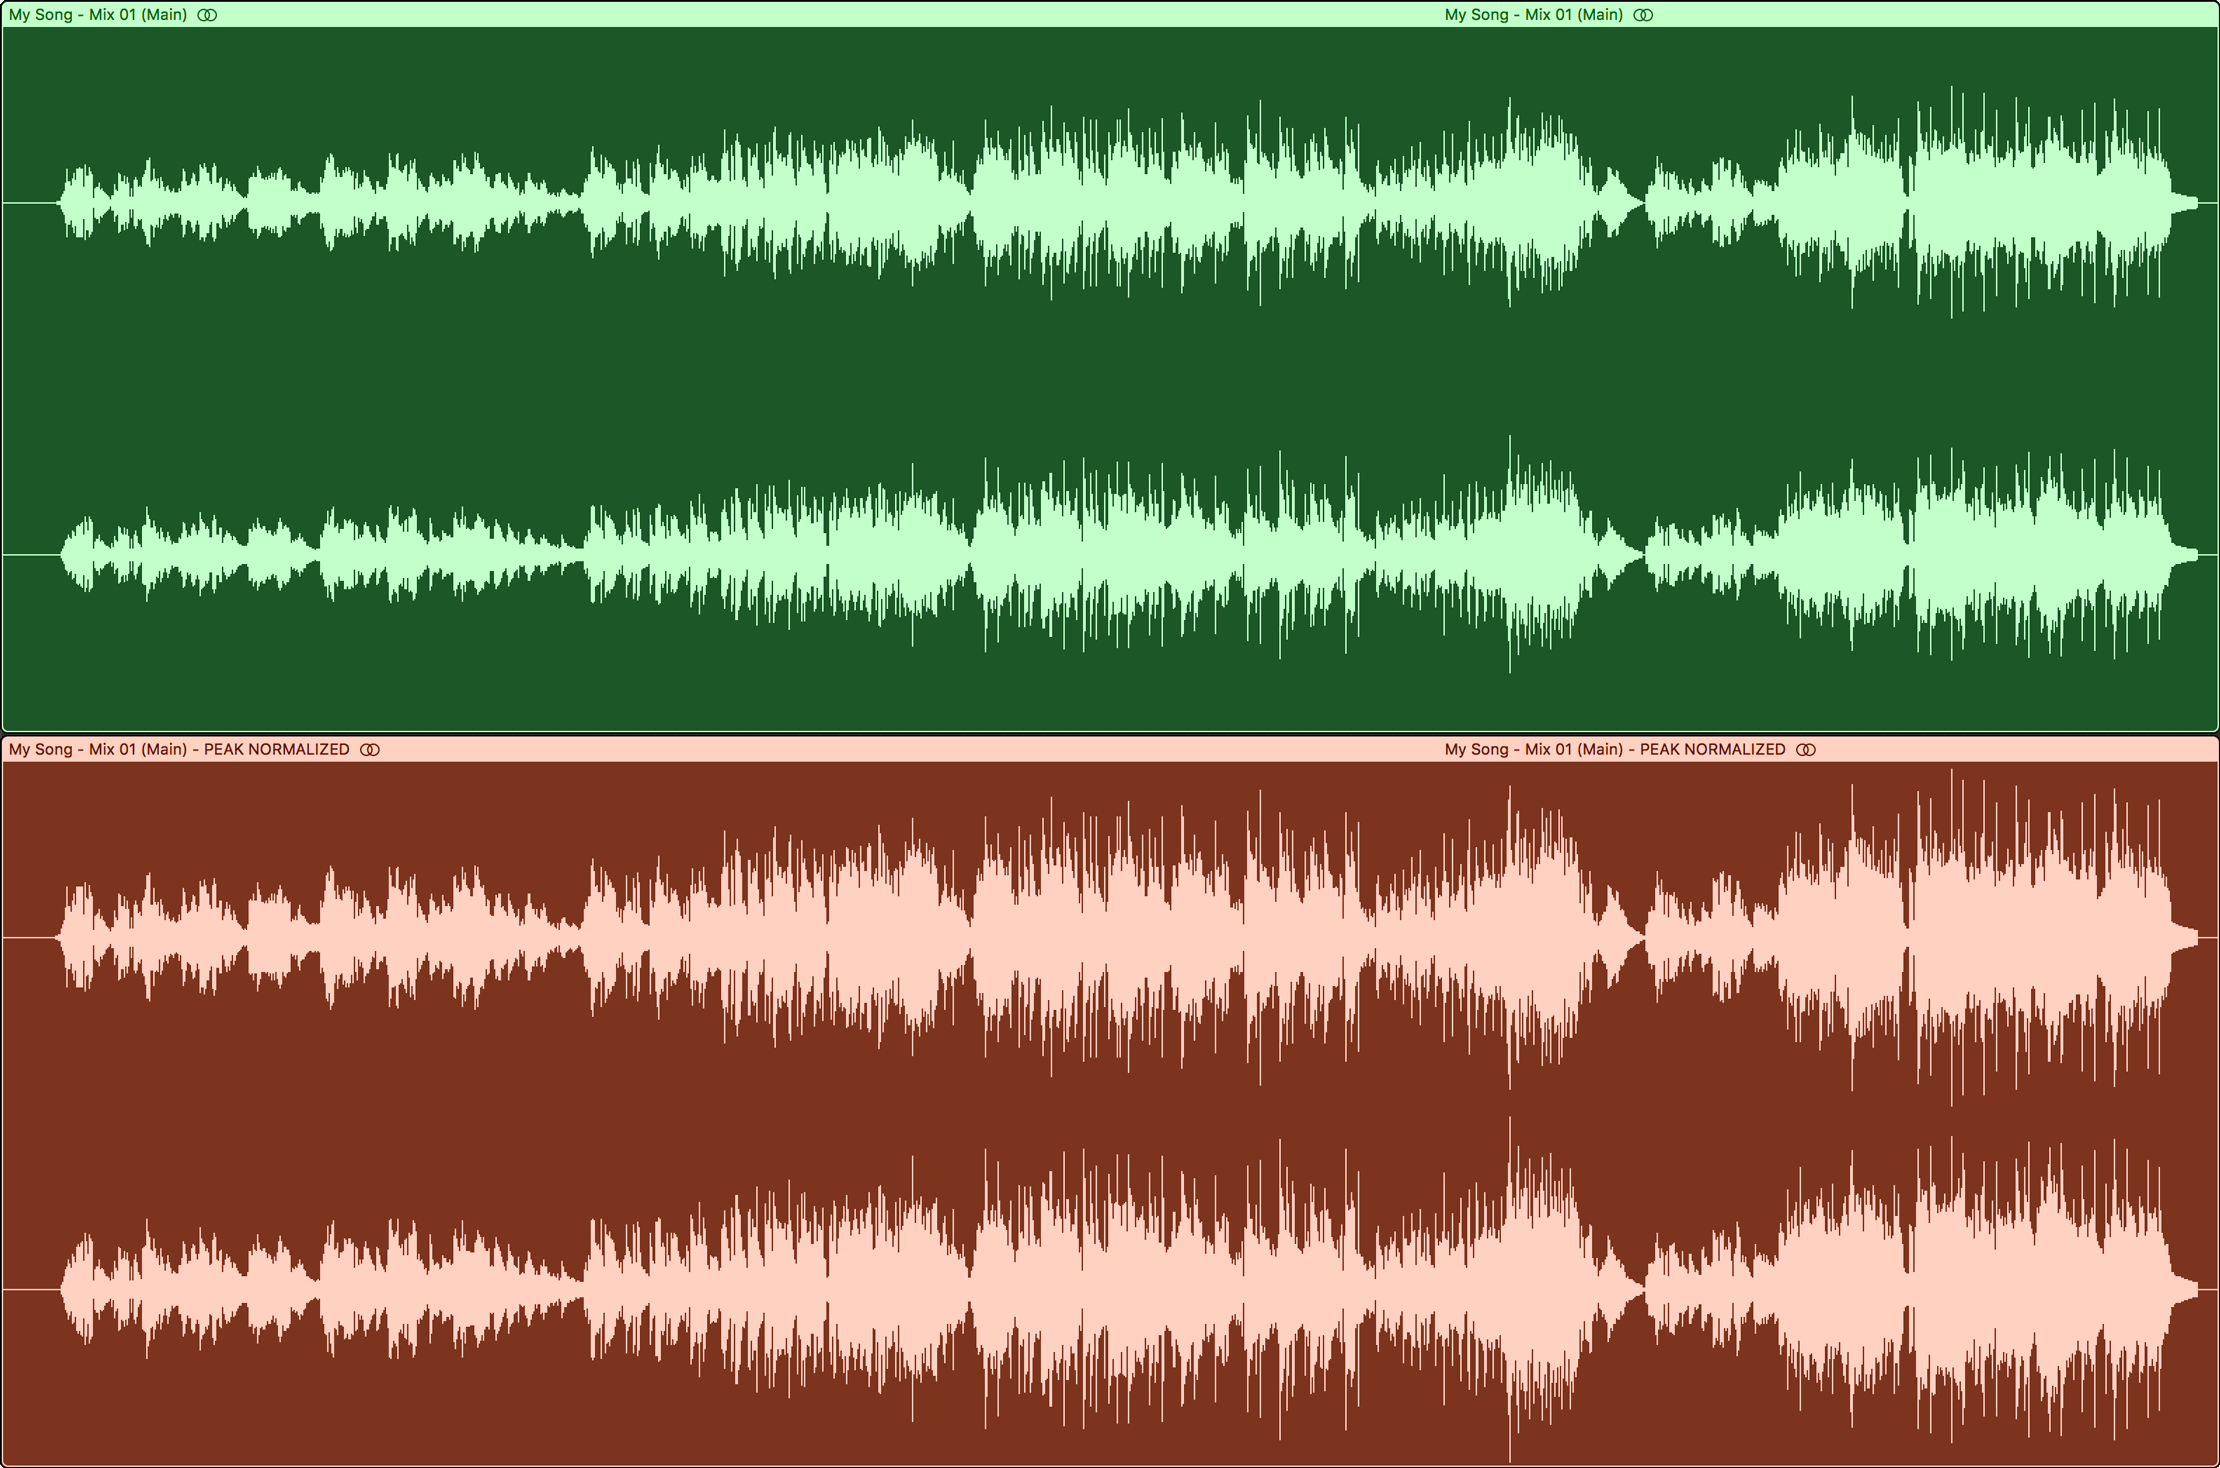
Normalization
Do not normalize your mixdown or use overload protection.Peak normalization changes the level of an exported mix by first measuring and then changing the amount of headroom.
There are two types of peak normalization:
Regular peak normalization raises the level of the file so the highest peak occurs exactly at full scale. This removes any headroom the mix used to have and it will change the overall level of the mixdown between revisions. This makes accurate recalls difficult.
Another type of peak normalization is called overload protection. Overload protection will not raise the level of a file, but it will lower a clipped mix. However, the stereo output should not have been overloaded in the first place, again the mix has no headroom left, and the level will potentially jump between revisions.
Plug-ins on the stereo output
If you have applied plug-ins to the stereo output then consider sending me a version without plug-ins as well.Do not bypass or remove plug-ins on individual channels and busses/groups/auxes in the mix.
The rule of thumb is that if you insert a plug-in or a piece of outboard gear on the stereo output early in the mix process, then it needs to stay on during the mixdown. Such a compressor or equalizer becomes an ingrained part of the mix, and removing it can make the mix fall apart.
However, mixing through software such as Ozone or T-RackS, especially if a lot of multiband compression or stereo spreading has been applied, can overcook the mix and severely limit what can be done at the mastering stage.
The best solution is usually to avoid excessive processing on the stereo output and obtain the desired sound on individual channels or via bus/aux/group channels in the mix itself.
If you remove plug-ins on the stereo output before bouncing then make sure you check your headroom afterwards. Lower your stereo output fader if the output overloads, then save your project to ensure accurate mix recall later.
Part 3 - Common mix problems and solutions
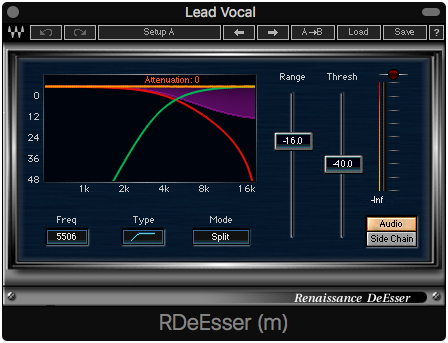
Sibilants and sharp consonants
Loud and sharp sibilants in a vocal should be controlled with a wideband or high shelf type de-esser and/or attenuated with gain or automation.Be careful with narrow band de-essers, which can more easily lead to lisping artifacts.
Backing vocals and dubs can often take considerable de-essing and still sound natural in context.
Uneven vocal levels
An uneven vocal is difficult to fix in stereo mastering. Unless the vocal is intentionally very dynamic, then make sure it is controlled and sits properly in the mix.Using region/clip gain, dynamic compression, and automation is an important part of making the vocal sit in the mix.
Pushing a single compressor harder is not always the answer. Instead consider spreading compression between two or more compressors, also known as serial compression. A simple serial compression chain on a lead vocal often consists of a fast and hard peak compressor followed by a more gentle averaging compressor.
It may still be necessary to do volume automation between sentences or different vocal parts in the song. Try listening to the mix at low playback level and make sure all words are audible and consistent between e.g. verses.
So-called “vocal rider” plug-ins rarely work well. Like most one-size-fits-all plug-ins they fix some problems, but make other parts worse.
Noise or hiss
Automate muting of non-active channels or use strip silence on individual audio files containing background hiss. This is especially important in the intro, during breakdowns, and in the outro.Electric hum, background noise and hiss come from analog recordings and outboard processing. This type of sustained noise can usually be reduced or removed with only minor compromises during mastering, if necessary.
Arbitrary clicks can happen both in the analog and digital domain and can usually be removed completely with no compromises during mastering.
Unintentional harmonic distortion or complex artifacts are the hardest to reduce during mastering, so these should be avoided in the recording or mixing process.
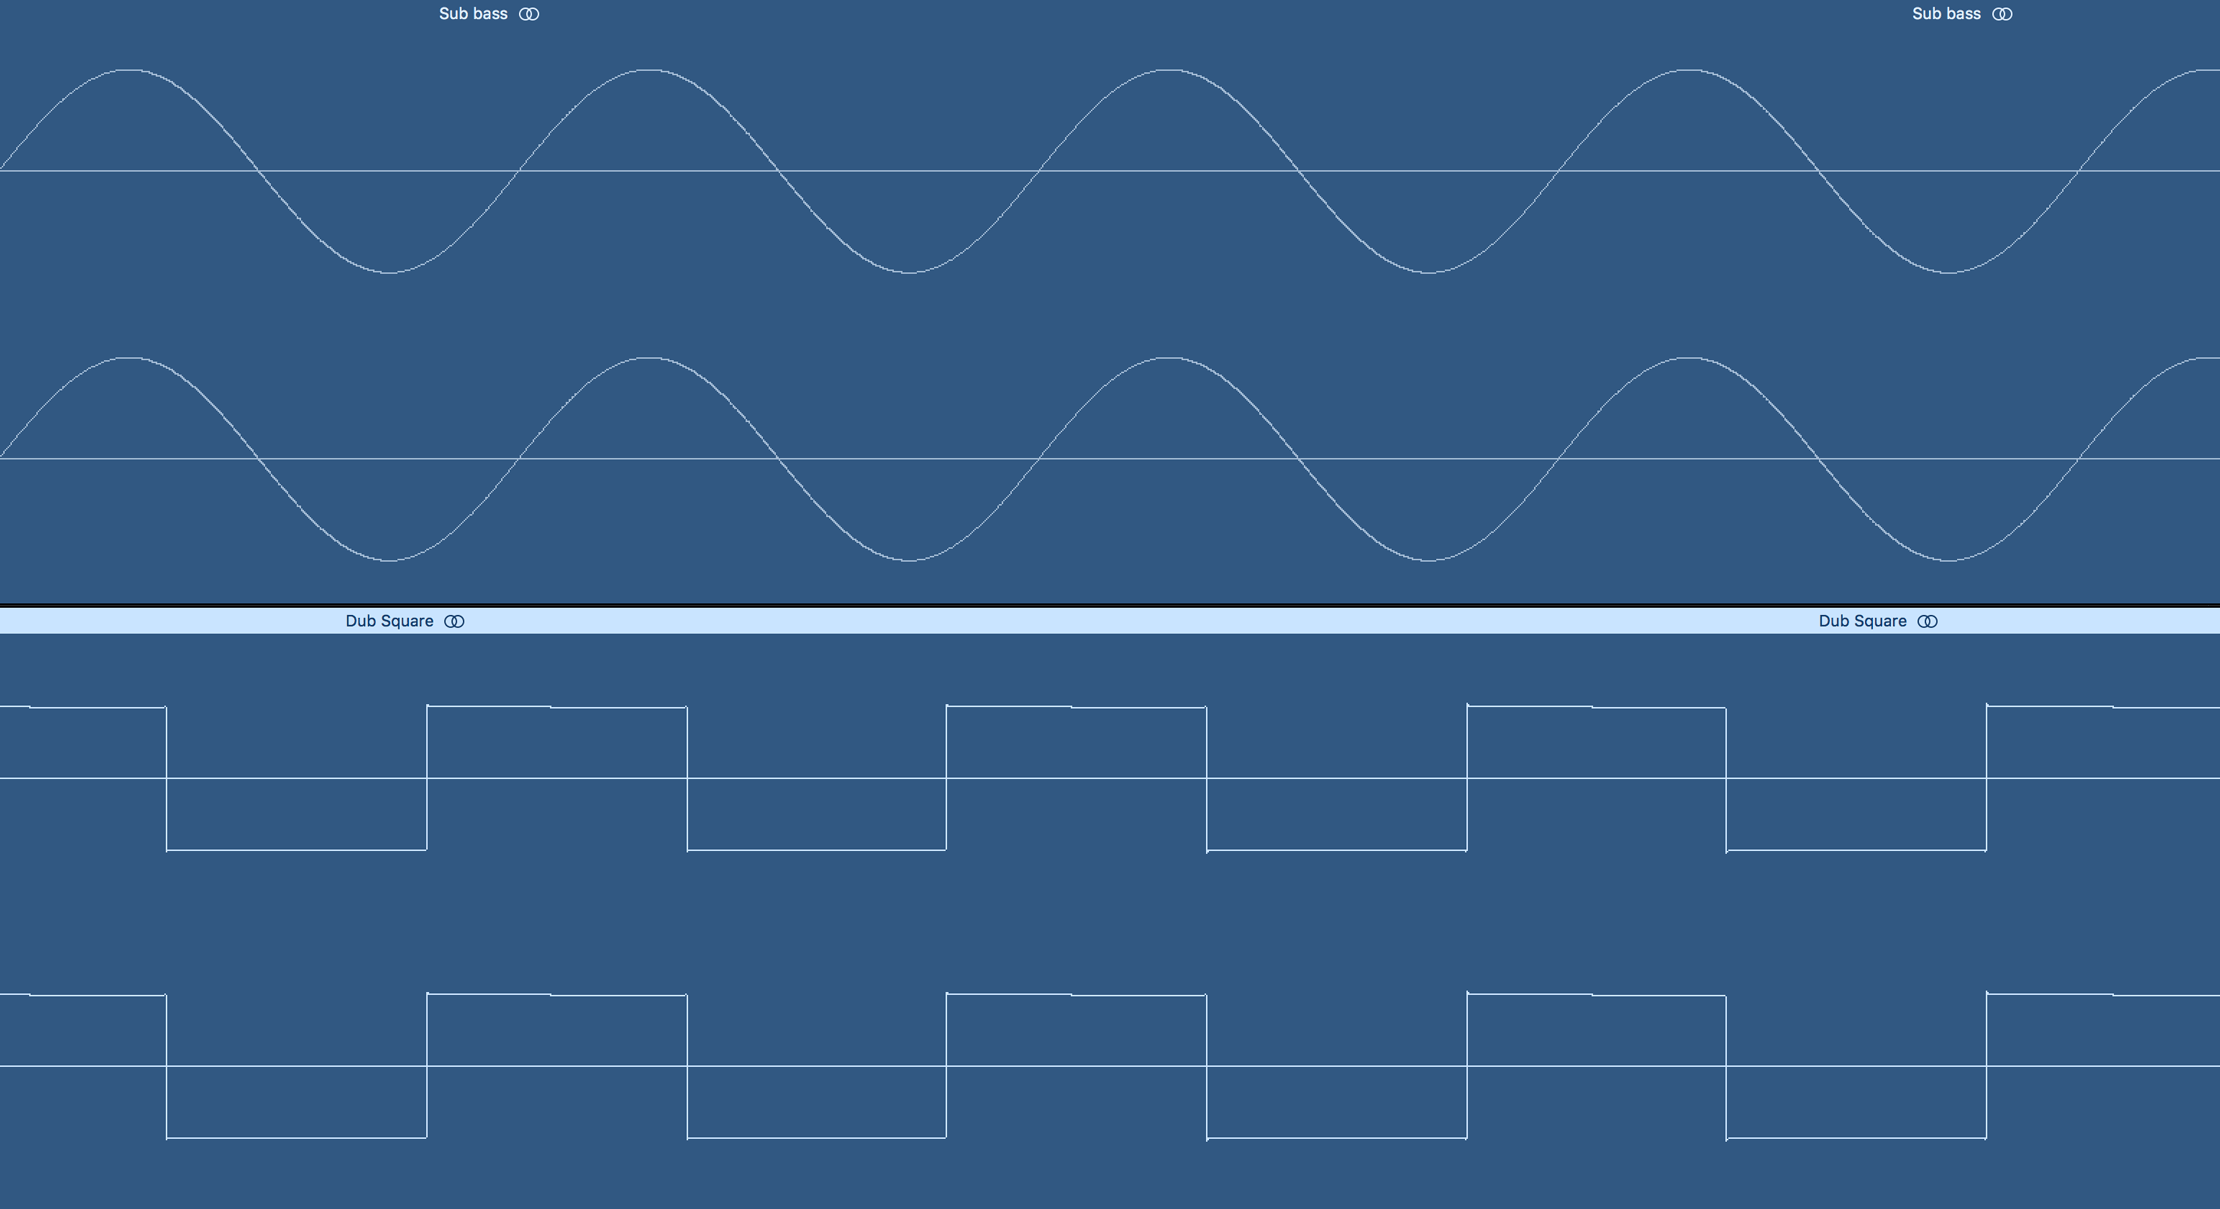
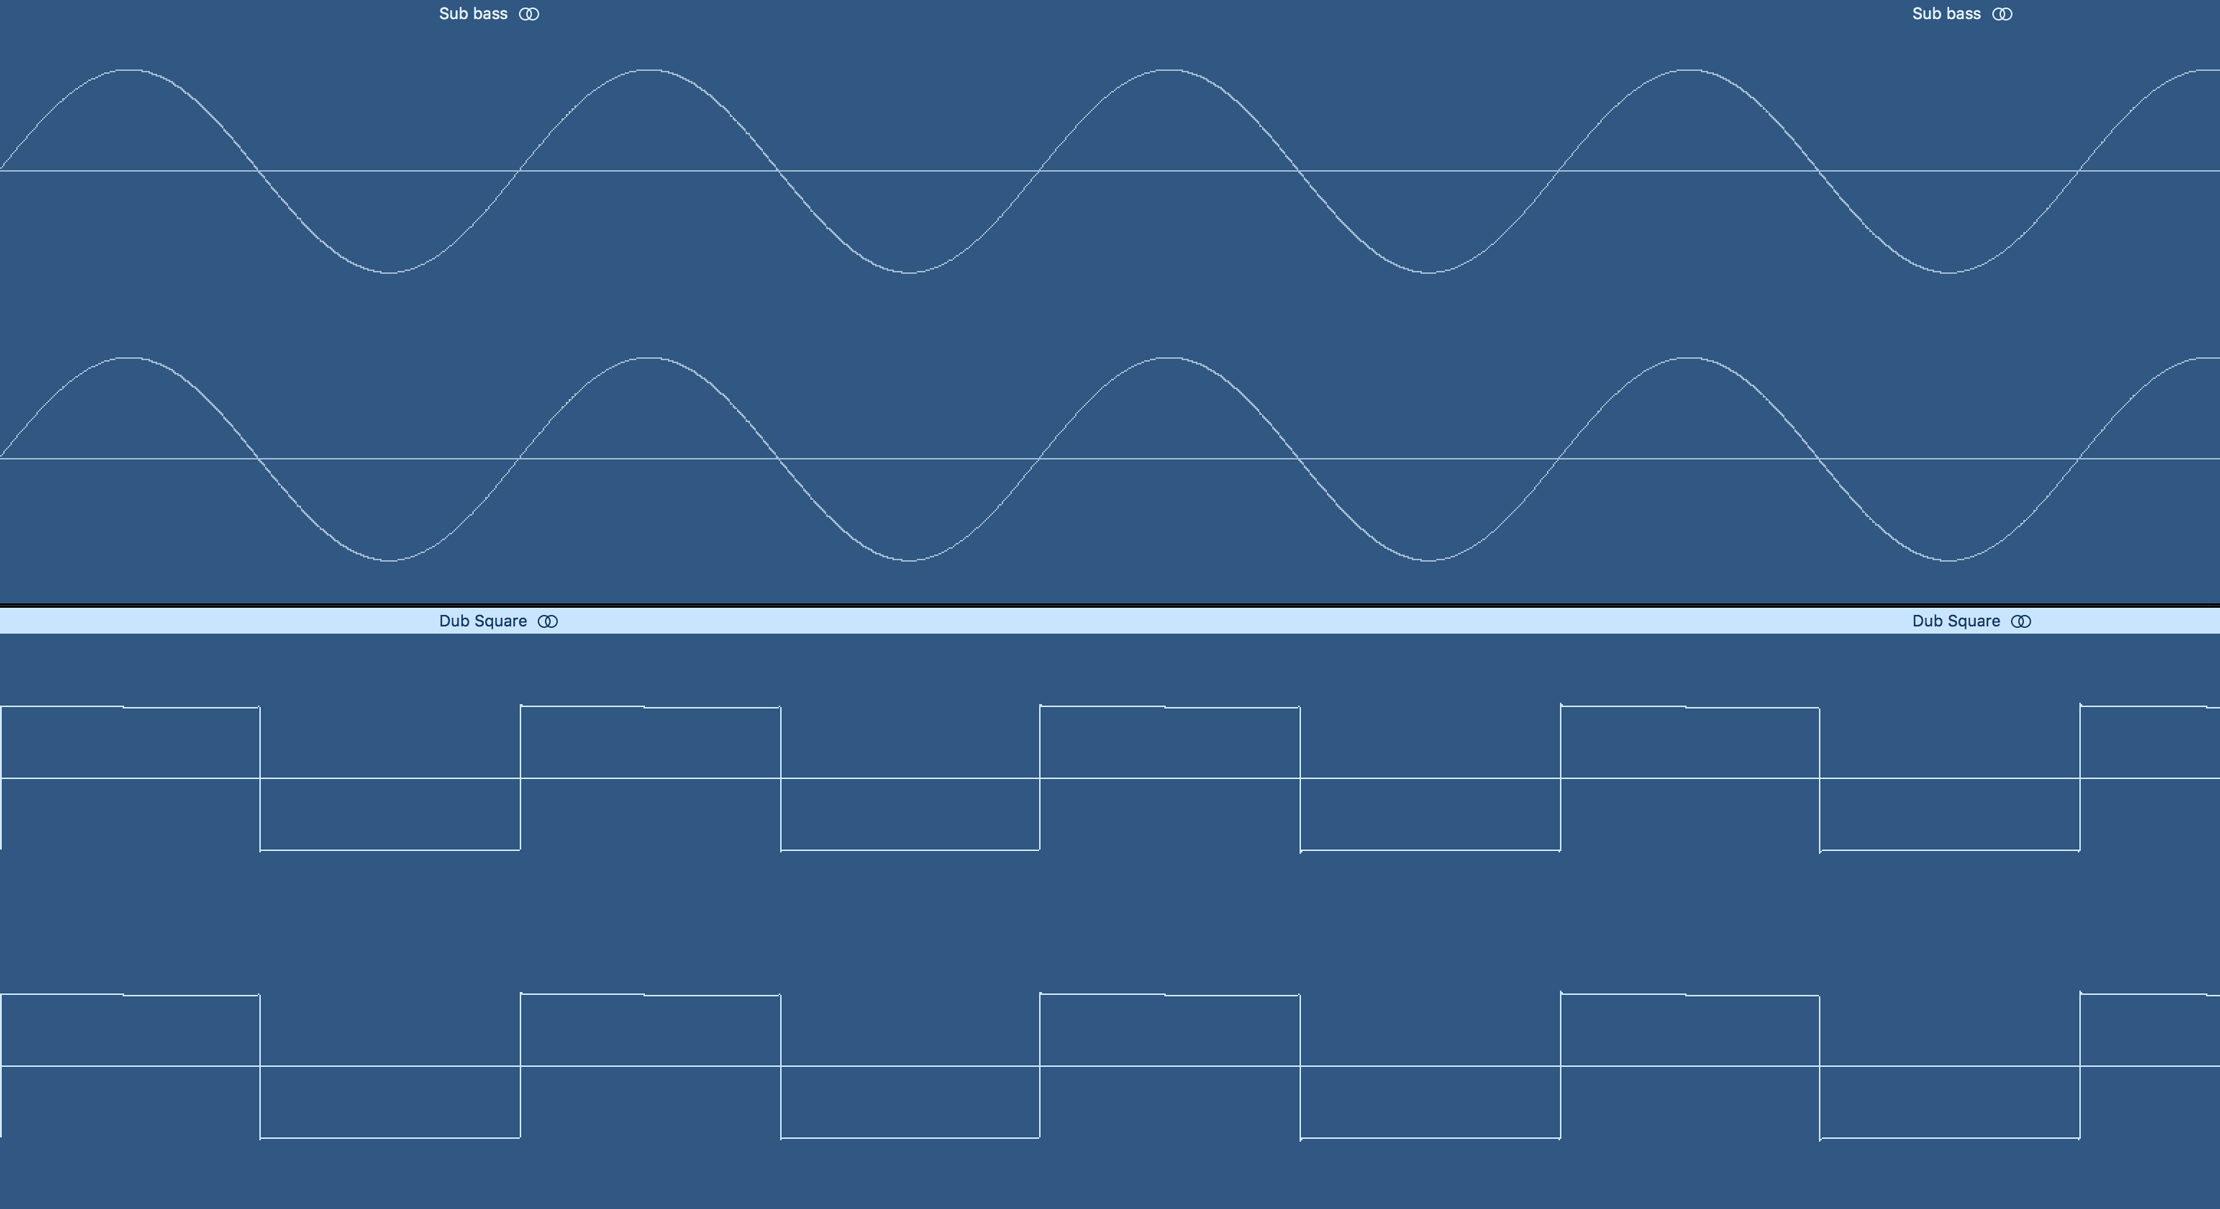
Phase or polarity problems between two sounds
If two sounds in the mix phase each other out significantly this can result in weak bass and a metallic phasing effect.Try inverting the polarity of only one of the problematic sounds. This is sometimes referred to as “phase flip” or “phase invert” even though it technically is polarity inversion. It is indicated by the sign Φ or Ø.
If polarity inversion does not fix the problem then try shifting the timing between the sounds slightly until they align more closely. Zoom in on the waveforms to make sure the peaks and dips align as much as possible. If the problematic sounds are software instruments then render them to audio files first.
As a last resort you can use an all-pass filter or a phase alignment tool such as Voxengo PHA-979 (AU/VST/AAX), Little Labs IBP (UAD/Apollo) or Waves InPhase (AU/VST/AAX), although it can also make the problem worse when used incorrectly.
Overly wide sounds that collapse in mono
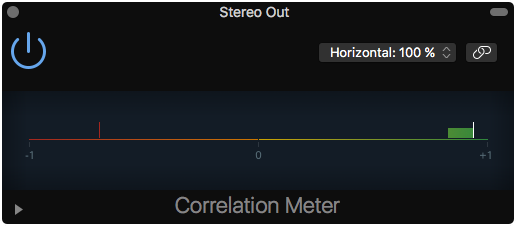
Unnaturally wide sounds will usually collapse when the mix is played back in mono. Check individual sounds using a correlation meter and listen to the full mix when it is summed to mono.A mono compatible sound will show up as +1 on a correlation meter while -1 will indicate a completely out of phase stereo sound. If you want to maintain a high degree of mono compatibility then avoid sounds that are unnaturally wide, and avoid using stereo spreaders.
A partial reduction of stereo sounds during mono playback is completely natural, but if a sound almost disappears then consider fixing or replacing it.
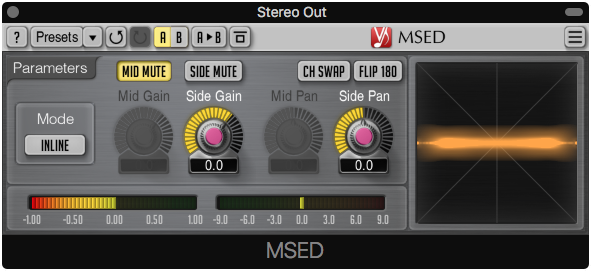
Bass frequencies in the side signal
As a rule of thumb it is not a good idea to have deep bass frequencies in the sides of the stereo image.This results in an unnaturally wide and unfocused bass that is out of phase. Wide bass lacks punch while still eating up headroom, and will more easily distort a master. Finally, out of phase sub bass will cause trouble on vinyl.
You can check for this problem by listening to the difference signal in your monitor controller or by using the free Voxengo MSED plug-in: Insert MSED as the as last plug-in on your stereo output and press the “Mid mute” button to solo the side signal of your mix. If you hear considerable bass frequencies while listening to the side signal this is a sign that your low end is out of phase.
Free download of Voxengo MSED (AU/VST/AAX)
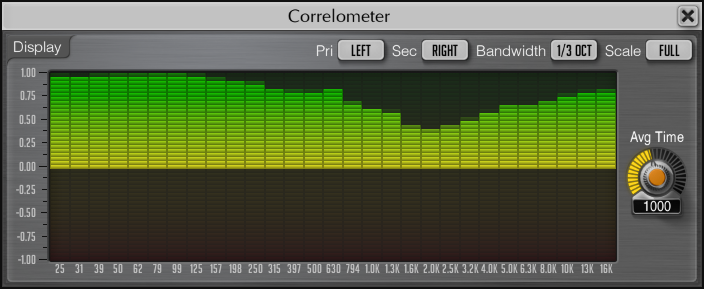
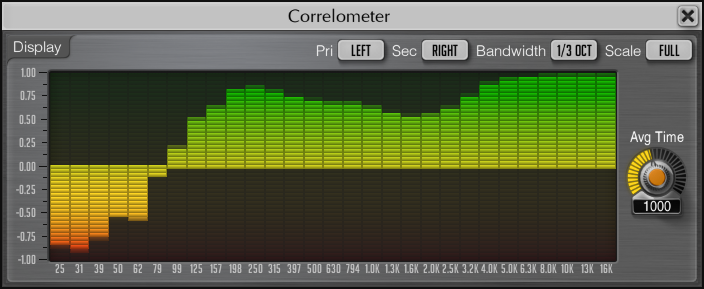
Voxengo also has a free plug-in that lets you visually confirm phase problems via a multiband correlation meter.
Free download of Voxengo Correlometer (AU/VST/AAX)
If you really want a perceived wide bass without low end phasing, then it is possible to fake it at the production stage.
You do this by dubbing a deep and fully mono compatible bass with a wide stereo sound. The stereo dub needs to have all its low end filtered out. When the two sounds play together, the summed sound is mono compatible in the low end, but appears wide due to the upper frequency stereo information.
Make sure your production has the space and priorities for this type of effect.
Excessive sub frequencies
Check that no channels contain unnecessary sub frequencies, such as pops in a vocal or rumble in a guitar recording.Always treat each sound individually and only filter if necessary. Some sounds do not benefit from being filtered at all due to the adverse effect of filter resonance and phase shift on that particular sound.
For the same reason, do not automatically low cut the entire stereo mix.
Part 4 - Versions and exporting for stem mastering
Apart from the main mix, no other versions are strictly necessary. However, most record companies also ask for at least an instrumental and a singback/TV version.
1. Main mix (MAIN)
This is the main or album version of the mix.
2. Instrumental mix (INSTR)
Mute all lead, dub, backing, and ad libs vocals.This version is often used for synchronization in commercials, movies or promotional material.
Most labels require an instrumental mix + master.
3. Singback/TV mix (SB/TV)
Mute only the lead vocal.Dubs, backing vocals, ad libs, and music remain. Sometimes ad libs are muted as well, this depends on the context and the performing artist.
This version is typically used as a backing track on stage or during a TV performance without a band.
In some countries this version is referred to as “Minus 1” (i.e. minus the lead vocal) or “Karaoke” version.
Most labels or performing artists require a singback mix + master.
4. Extended version (EXT)
This version typically has an extended rhythmical intro and outro that allows a DJ to beat mix the song for an extended duration.
5. Radio edit (EDIT)
Often the main version is sent to radios, but sometimes an even shorter version is made, e.g. without an instrumental intro.
6. Clean edit (CLEAN)
“Clean” has nothing to do with the sound, but instead swear words have been blanked, reversed or speed faded in the mix.
7. A cappella (ACA/VOC/VOX)
Mute all music, only the vocals remain.The vocals sound exactly like they do in the mix, only without music. The a cappella can sometimes later be combined with the instrumental (for re-balancing or stem processing purposes), but most succesfully if no mixbus processing was applied during bouncing.
In the US "a cappella" is usually concatenated as "acappella".
8. Vocal up mix (VOC UP/VOX UP)
Sometimes an alternative mix with the lead vocal or all vocals turned up (e.g. +1 dB) is included. This can be used for last minute editing at the mastering stage, e.g. inserting the vocal up version in the choruses only.I will always use the main mix, not the vocal up mix, unless I have been told to use the vocal up mix or it is left to my discretion.
9. Reference master (REF/LIM)
This is included by the mix engineer or producer as a ballpark guide for the mastering engineer. Sometimes it is just the main mix with limiting, sometimes more processing has been done. The reference could also include a fade out guide.
Naming files
Make sure you clearly name files and mix revisions:Song title - Mix revision number - (Version type).
Example:
Solo Dance - Mix 02 (MAIN).wav
Solo Dance - Mix 02 (INSTR).wav
Some like to insert the date into the file name as well. ISO formatting is the best choice as it will file sort correctly, reducing the potential for errors: yyyy-mm-dd, i.e. 2019-05-16.
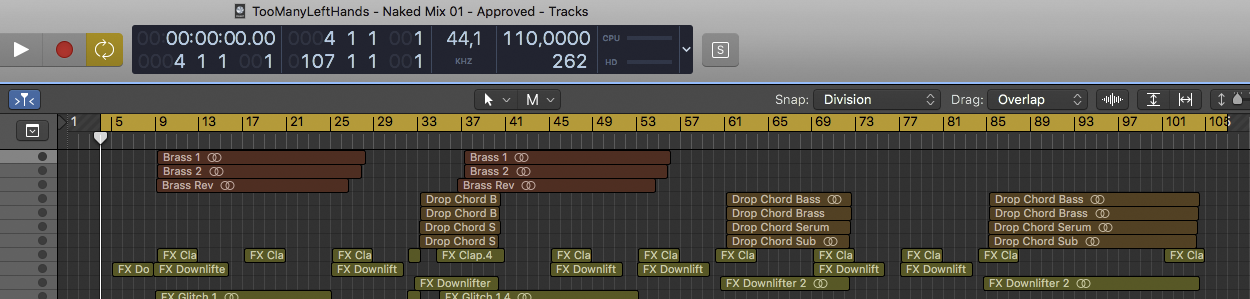
Exporting stems for stem mastering
Most of the time a stereo mixdown is the best solution for mastering. However, it is possible to address certain issues or have more flexibility with stems in the mastering process. Stems are separate exports of groups of instruments or vocals in the mix.My stem mastering service is divided into four tiers:
· Three or fewer stems, e.g. vocals, bass, rest of the music (without the bass guitar or bass synth)
· Five or fewer stems, e.g. lead vocal, backing vocals, bass, kick drum, rest of the music (without the kick and bass)
· Ten or fewer stems, e.g. lead vocal, ad libs, backing vocals, bass, kick drum, snare drum, rest of the drums, guitars, lead synths, pads
· More than ten stems and we are into mixing territory, so ask for a quote
Typical things to be aware of when exporting to stems:
1) Export all files from the same starting point and make sure you include any effect tails at the end of the song
2) Make sure the stems maintain their relative levels and that normalization is turned off
3) Make sure that any external side-chain compression or sum compression is still active
4) Include a reference stereo mixdown
Exporting correct stems from a mix requires strict attention when side-chains and busses are involved. It is imperative that you import your exported stems and double-check how they sound when played together, before sending the files to mastering.
Part 5 - Codes and special target formats
ISRC - International Standard Recording Code
The ISRC is a code that follows each song and is used to identify the song on various digital platforms and CD’s.The ISRC is a twelve character code:
DK-ABC-19-001-01 (country code - record label code - year of registration - release number - track number)
So the above code would mean DK for Denmark, ABC for the record label, 18 for the year of registration, 001 for the first release of the year and 01 for the first track in this release. All US country codes have been used up, so the US is now called QM or QZ.
The base code is supplied by IFPI or a similar organization in your country. If you self-publish your music I do not recommend buying codes via a middleman, such as CD Baby, since you want to fully control ISRC’s yourself.
If you need ISRC’s in your master CD/DDP or MP3 then please send the codes to me. It is also possible to embed an ISRC in a WAV file, although this has little practical relevance since ISRC’s are manually input when uploading songs to an aggregator.
The ISRC is also necessary in order for so-called neighboring rights to be paid out to the master owner of the recording (typically the record company or production company), the producer of the song, and musicians/artists performing on the song.
Neighboring rights should not be confused with other royalties, such as performance and mechanical royalties for song writing or producer and artist sales royalties. These royalties can also potentially be tracked with the ISRC.
UPC/EAN - Universal Product Code/European Article Number
A UPC or EAN is a bar code number that follows a release or a CD. It is not mandatory to input a UPC into a CD, but some online shops require it.You can buy a UPC from the Uniform Code Council (GS1-US) in the US or a EAN (GS-1) from EAN International in Europe.
Red Book Master CD or DDP
Most CD’s are delivered to the factory as a digital file called a DDP file. It is possible to get a physical Red Book Master CD as well.The DDP contains all the audio, information about gaps between tracks, and codes such as ISRC’s and maybe a UPC/EAN.
A DDP can also contain CD-Text, which can hold information such as the album title, individual song titles and the name of the artist. CD-Text is only displayed on some CD players and is generally not read by computers. CD-Text can not contain special characters.
If you want iTunes or similar software to display information about a CD, then you need to submit your CD to
Vinyl
There are no special requirements for mixing to vinyl per se. However, three things to be aware of that can influence the quality of the cut:1) Sub bass should preferably be mono compatible in the mix.
2) Excessive high frequency content and vocal sibilance should be tamed as much as possible in the mix.
3) Intentional clipping or distortion in the mix can sound exaggerated on vinyl.
The rest is taken care of in the vinyl mastering.
For the highest quality on a 12" 33⅓ LP album I recommend staying below 20 minutes of playing time per side. Up to 22 minutes will sound acceptable. Longer playing times mean that the overall quality of the whole side is reduced, not just the part exceeding the recommended playing time.
The last track(s) on each side of a record are always reduced slightly in quality, since the fidelity is reduced the closer you get to the smaller, inner circles of a record.
Many plants demand PQ sheets with track durations and gaps in order to cut accurate visual track marks (VTM's) on the vinyl. Ask your plant in advance for a spec sheet and I will deliver what you need.
Broadcast loudness targets
TV commercials have to follow the EBU R128 loudness standard in Europe and the ATSC A/85 regulations in the US.Cinema advertising follows the Leq (m) 82 dB SAWA standard. Please let me know and I can deliver any formats you need.
Streaming optimized versions
In most cases the main master will work perfectly on all digital platforms and on the air.However, it is possible to order a specific streaming optimized master that closely matches the latest integrated loudness and peak target of a particular platform, such as Spotify, Tidal or YouTube.
Let me know and I can provide any additional versions you wish for.
Apple Digital Masters (ADM)
Apple Music still accepts 16 bit 44.1 kHz files, which are then converted into AAC by Apple.ADM is Apple’s attempt at making higher quality AAC’s without ramping up the actual encoding bit rate. Instead ADM requires a higher quality source file of least a 24 bit 44.1 kHz. Originally this was paired with a demand for “safer” masters, i.e. no inter-sample peaks and lossy encoding overs, but this demand has been scaled back a bit.
Apple only accepts ADM masters from an ADM whitelisted mastering engineer through an Apple whitelisted aggregator such as CD Baby, Tunecore or a major record label.
Online Mastering.dk has been on the Apple Digital Masters Providers List (originally known as MFiT) since 2012.